We may receive a commission when you make a purchase from one of our links to sites such as eBay and others. As an Amazon Associate we earn from qualifying purchases. Thank you for support!
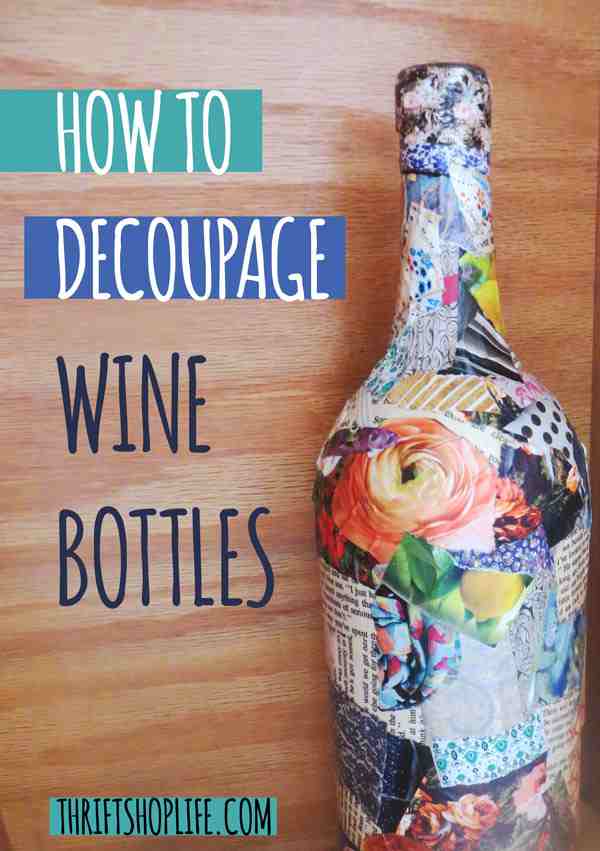
Today I will share my little tutorial on how to decoupage a collaged wine bottle.
Here’s what I made, isn’t it awesome?

I love the texture and all the patterns from the papers!
Why decoupage wine bottles? Well, because I have a bazillion of them. Ray and I ran a successful junk removal company for nearly 10 years and so anytime we would get them from a junk job, I would hold onto them to use for crafts!
While Ray + I don’t drink at all, I also often have our family and friends to save them for us just so we can use them for crafts!
I’ve been wanting to do this project for a very long time, so I’m so glad I finally got around to it!
This project tutorial will also work on other bottles also! Any bottle – Plastic bottles, wine bottles, vases, whiskey bottles, soda pop bottles…have a blast with this!
Important Note: Collaged bottles should only be used for decorative purposes – no food or beverages inside!
Okay, so are we ready to get started!?! Let’s get on to the tutorial for making collage and decoupage wine bottles!
Step 1: Gather Your Supplies
For this project, you will need:
- Old Book or Magazine Pages
- Clean, Empty Wine Bottle
- Decoupage Glue
- Paint Brush
In my post about how to decoupage, I wrote about all the basic decoupage supplies you’ll need, so if this is your first time decoupaging, you might want to check it out for some great tips!
What is the Best Decoupage Glue for Wine Bottles?
You can use any kind of decoupage glue for wine bottles – glue of any kind typically does not have any problem adhering to glass as long as it is clean and dry.
Any type of mod podge will work to decoupage on glass, and they have several different types, even a dishwasher safe mod podge!
While I wouldn’t recommend using the decoupaged wine bottles for serving drinks, this is a good idea to use if you plan on using them as flower vases or if you ever want to be able to clean them easily over time.

Mod Podge Dishwasher Safe Waterbased Sealer, Glue and Finish (8-Ounce), CS15059 Gloss, 8 Ounce
For glue for this project, I didn’t have any Mod Podge, so I used Elmer’s Glue-All and watered it down a bit to make it thinner.
Elmer’s Glue All does work just fine, but be aware that it will start to yellow a bit over time since it is slightly acidic unlike other decoupage glues. This doesn’t bother me one bit, but it might bother you, so I’m letting you know in advance!
Mod Podge and decoupage mediums generally come in various finishes – such as matte, gloss, etc. I love matte, but a lot of people love gloss. Just depends on whether you want it to have some “shine” to it or not.
If you don’t have a gloss decoupage medium though don’t worry, you can always varnish it with a gloss finish!


Where to Get Decoupage Papers and Images for Wine Bottles
I have a ton of old books and magazines, so I decided to use those. While I’d like to say I had a method for how I tore out images and pages, I can’t say I had one at all.
I just haphazardly ripped out the book pages as I went, not really paying a whole lot of attention. I suppose you could cut out different words and quotes and phrases and make perfect neat little strips – but I’m a creative crafty messy type of person who far more likes and loves the chaos and imperfection of ripped pages.
If you like order and neatness however, you’ll probably want to cut out your images and have them arranged in a nice stack before you start gluing things down!
There are lots of cool spaces and places where you can get images for your decoupaged bottles – in this tutorial I used old book papers and pages I ripped out of books, but don’t limit yourself to just that! {Especially if you’re the book lover who can’t bear the thought of destroying books!}
Some ideas:
- Scrapbook Paper
- Newspaper
- Magazine Clippings
- Sheet Music
- Poems & Quotes
- Old Book Pages
Printed Items: Note, if you are printing out images you should make sure you do so with a laser jet printer – the glue/mod podge/decoupage medium will likely smear the ink jet ink! If you don’t have a laser jet printer, take to a local print shop for color copies – economical and easy!
Of course, I lean towards getting the books and magazines and crafty supply stuff from your local thrift stores and flea markets – but that’s just me. 🙂
Need more ideas? See our post on where to find free papers for decoupage.
What Type of Brush to Use to Decoupage Mod Podge?
For my bottle, I decided to use a regular 1/2″ paint brush to apply the glue. I like how the brush will leave strokes in the finish this way – here’s a close up of the bottle while it was drying:

I like this because it gives it a “painterly” effect – but I know not everybody likes that kind of finish. If brush strokes bother you or drive you crazy that they don’t line up perfectly, I recommend using a foam brush or even make-up foam sponges – that will help avoid those brush strokes if you don’t want them!


Step 2: Start Decoupaging Your Images to the Bottle
There’s a little bit of method to the madness of making a collaged decoupage wine bottle like the one I created, although you really can’t go wrong so don’t stress it too much!
With my project, I started at the neck of the wine bottle. I suppose you could start at the top or even the bottom and I really don’t know if there’s one way that’s better than another – it’s probably just a matter of personal preference!
Here are some things you should remember though:
Start With Larger Pieces of Paper First
If you’re collaging and decoupaging with images or phrases, you’ll want to make sure you start with all your big pieces of paper first and then add in the small tiny ones.
Because our wine bottle is round, you’ll want to make sure your pieces aren’t TOO big however – the smaller and thinner they are the easier it will be to decoupage them on without too many wrinkles or bubbles!
If you look at my decoupaged wine bottle carefully, you’ll notice that I definitely have some wrinkles in places and this comes from using too big of papers (and, honestly, maybe a lack of patience on my part lol).
Some people will think about how to place the designs before proceeding to glue it all down – I though just love to make a big giant mess and have fun as I go.
Entirely up to you – no pressure to do it either way, because the fun part of crafting and creating – is that it’s supposed to be fun!!!! So if you’re getting stressed out, you’re doing it wrong. Let go and let the wine bottle tell you how to glue stuff on.
How to Glue Your Images to The Bottle
What I do to glue the images to the bottle is use a paint brush and paint the glue onto the paper and then on the bottle. Next, I stick the paper to the bottle and then go over with another coat of glue with the brush – yup, brush on a light layer of glue right over the image!
Working Images Over The Neck of The Bottle:
Here is an important tip for working around the neck of the bottle: Use very small pieces of paper! Small pieces of paper won’t tear or wrinkle nearly as much and it just a whole lot easier to apply!
You can also use long, narrow strips that you wrap around the neck of the bottle. These also will not wrinkle so easily!
Step 3: Allow to Dry and Continue Adding on Layers of Glue
Most likely as you work along making your wine bottle, your first images you collaged down will be dry by the time you get back to that point.
Decoupage is a process where you definitely will want to add multiple layers of glue on top of your ripped papers and images, but it’s important that you let the first coat of glue dry first before you apply a second or third one!
I think for this bottle I did about 2 coats, but you may want to do more if you want a thicker finish.
Step 4: Sealing With Varnish or Gel Medium
This is somewhat optional because white glue or Mod Podge will work just fine as both a sealer and a varnish, but I wanted to give my wine bottle some durability and a little gloss since I was working with just plain white glue.
You can see the gloss gel medium also leaves brush strokes in the finish – which is an effect I like, but if you don’t like brush strokes do not use the gel medium!
To seal your work and to make it waterproof, you will want to get one of the “spray paint sealants” – it’s a clear waterproof sealer spray they sell in the craft as well as the paint section at most retail stores.
Mod Podge does have a brand for that, so does Krylon. I kinda liked the Krylon Clear Coat more when I used it on another project I had last summer.

Be sure to read all safety directions for use and use in a well ventilated area or outdoors!
I hope you enjoy this little tutorial on how to decoupage a wine bottle, and if you make one do let me know how it turns out! 🙂
I collected a lot of wine bottle, I would like to make them for Christmas gifts.
Thank you very much
Very informative. ???? Thank you for sharing! ????
Enjoyed the info. I have quite a collection so far and they are looking great for the holidays.
me gustó .lo voy a intentar con servilletas
Thanks! We have this tutorial for napkins – I never thought to do that on a bottle, awesome idea 🙂 https://resalvaged.com/how-to-use-paper-napkins-for-decoupage-tips-where-to-find/
Thank you so much for sharing. I’ve always wanted to do this, but I thought it was for advanced crafters. I now have the confidence !
Aw, I’m so glad it’s helpful for you! It is fun and easy!
I love your tutorial. I love decoupage. I had done some wine bottles. I did a few as baby shower, I color it glitter blue because were baby boys. Came out really nice. I’m doing decoupage for 20 years, but your tutorial was excellent. Thanks.
Aw thanks Nora, I appreciate your comment – made my day today! Glitter sounds like fun too!
I wrap jute around a wine bottle than hot glue sea shells on it.
Oooh Annie I love that idea! Thanks for sharing it with us!
During the pandemic, I made hundreds of cotton mask using colorful material. I kept the scraps for crafting. I have used the scraps for decoupaging glass bottles. They turned out great! One large liquor bottle now holds my change (except quarters) on my night stand. I smile every time I look at it.
That sounds like a wonderful project carol! I have a bunch of fabric scraps I just might have to try that on!