
We may receive a commission when you make a purchase from one of our links to sites such as eBay and others. As an Amazon Associate we earn from qualifying purchases. Thank you for support!
Today we are sharing 17 different types of outline stitches you can use in embroidery. If you are looking to take your embroidery skills to the next level or want to try something new, changing up the type of outline stitches you use can give you some great results.
Here are 17 outline embroidery stitches for you to explore!
1. Outline Backstitch
The outline backstitch is probably what you most often think of when it comes to outline embroidery stitches – and it very well may have been the first one you learned.
Work from left to right on line to be embroidered. Bring needle to right side of fabric, take stitch of required length, bringing the needle back, with a back stitch, to right side of fabric, midway and close to the left side of first stitch. Repeat indefinitely.
When you are doing backstitches for outlines, it’s important that the stitches are equal length and the needle is always brought up on the same side of each previous stitch.
2. Thick Outline Stitch
The thick outline stitch is done the same way as the regular outline backstitch, except that stitches are carried at an angle across the line to be embroidered, instead of directly on it. This stitch when wide, instead of done narrowly, is slanted satin stitch.
3. The Stem Stitch
The stem stitch is a common and popular outline stitch and is done nearly identical to the backstitch except it is reversed and there is more thread on the top – imagine if you were to backstitch upside down!
To make a stem stitch, follow the exact same method you would for the backstitch, except bring the needle forward instead of backwards before going backwards into the middle of your first stitch.
4. Split Stitch

Split stitch is worked like an ordinary outline backstitch, except that the needle is always brought up through the thread, which is “split” by the new stitch.
This is a great stitch to use for very delicate outlines, and the effect is somewhat that of a stem stitch or a loose chain stitch where the chains are not well defined.
5. Twisted Outline or Reverse Couching
The twisted outline embroidery stitch is done by doing running stitches along the line you want to outline. A second thread is wound back on the surface by passing under each stitch.
6. Cable Stitch (Twisted Chain Stitch)
The cable stitch, also known as the twisted chain, is done by bringing the thread and needle to the front from the back and then you go down the thread with your left thumb to bring the needle at a slant from the right of the thread, brought out at the left and pulled through.
The second stitch repeats the process, and you insert the needle back to the right of the finish of the last stitch.
7. Coral Stitch or Beaded Snail Trail (Knotted Outline Stitch)

The coral stitch is known by a few names, sometimes as the beaded snail trail or the knotted outline stitch. It is is done in a similar way as the twisted cable outline stitch, except it has longer intervals between stitches to create a more knotted look.
It can also be done so the needle may be passed under straight, from right to left, instead of at an angle.
8. Raised Rope Outline
The raised rope outline is also a very similar stitch to the twisted cable stitch, but in this case the needle inserted at an angle and immediately beneath the previous stitch.

In this stitch, the thread is brought out around itself so that it creates a roped appearance.
9. Broken Chain Cording
Broken chain cording is begin like a chain stitch where you hold down the thread with your thumb, and insert the needle just below and to right of starting point. However, instead of bringing the needle out at the starting point, you would bring out your needle about an ⅛ inch below and in line with starting point, pulling through to form the loop.
Then you repeat, inserting needle to right and outside of loop.
10. Chain Stitch

The basic chain stitch is a common outline stitch, and is done just like we did above for the broken chain stitch, except you insert the needle in the same hole as the starting point and inside the loop.
11. Zig Zag Chain Outline Embroidery Stitch

This is another fun variation of the chain stitch that is done in a zig zag slanted fashion. It is just like the regular chain stitch, except the needle is inserted at an alternating 45 degree angle instead of straight up and down.
To do a zig zag chain stitch, simply draw two parallel lines and alternate at a 45 degree angle between the two chains.
12. Knotted Chain Stitch
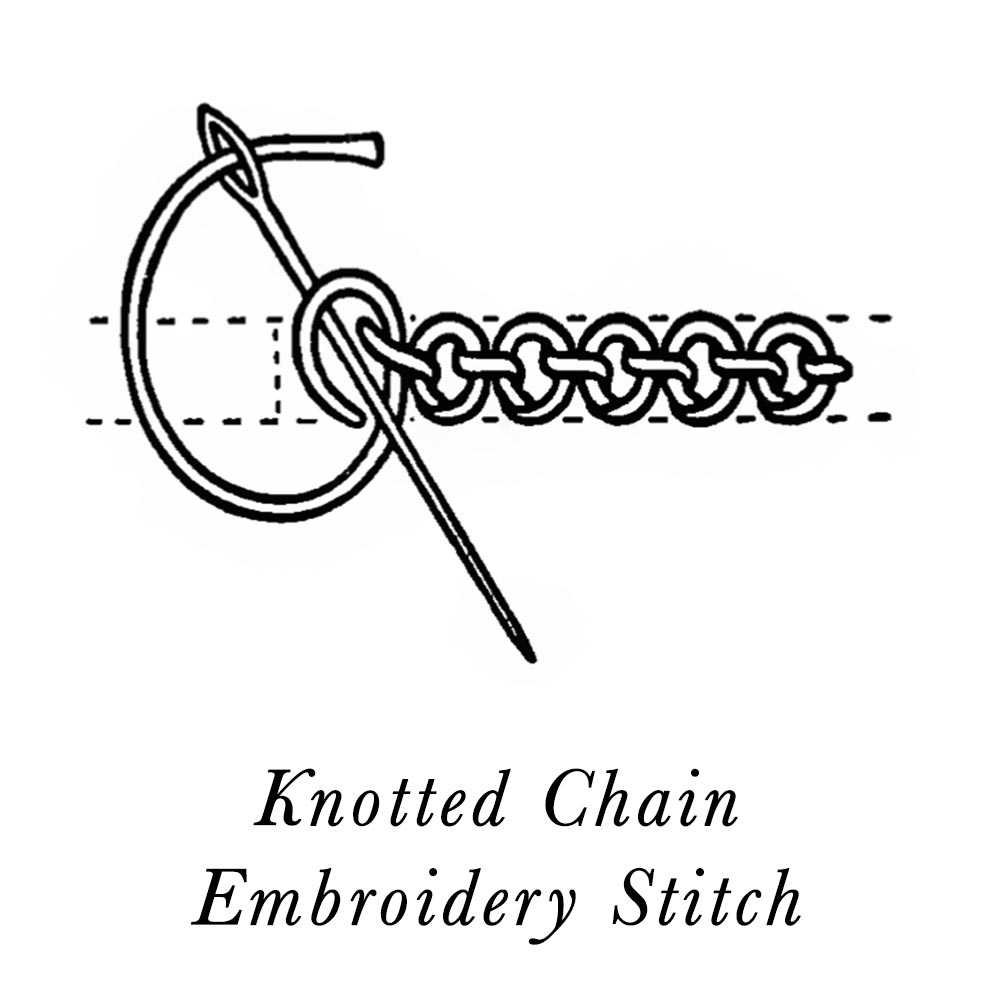
The knotted chain stitch is done very similarly to the chain stitch, but creates a different effect.
See How to Do The Knotted Chain Stitch for specific instructions!
13. Knot Drop or Gordian Knot Stitch
This stitch somewhat resembles the beaded snail trail at first glance but the method to create it is quite different.
Bring your thread to right side of fabric and hold down with thumb. Pass point of needle under and over your thread from left to right and take up small stitch on the outline, throw the thread to the left, around the point of your needle and pull tight. Start your second knot ¼ inch below the first.
14. Double Beaded Stitch
The double beaded stitch is done like the Beaded Snail stitch we shared in #5, but this one is worked in a zig zag line instead.
When you hold the thread down for the right hand knot, the needle is inserted slightly downward from right to left. For left hand knot, it is inserted from left to right.
15. Link Stitch
Link Stitch is a variation of the chain stitch. The first link is made like a basic chain stitch, and then when the thread is brought to the right side of the fabric at base of link, it is held down and the needle passed under and over it as we did in the knot drop stitch (Number 11 on this list!) and is inserted ⅛ inch below the base of first link, to be brought out again, in a straight line ¼ inch below. Then you will bring the thread to the left, thus forming a large and a small link.
16. Scaling Stitch
Scaling stitch is done by creating a line of parallel straight stitches. A second thread winds over these, scaling from one line to the next.
17. Heminway Cable Stitch
The Heminway cable stitch, not to be confused with Hemingway, was named after General Merit Heminway, who started the company M. Heminway and Sons Silk Co. in 1846. They were the first company to produce fine silk embroidery threads on spools.
The Heminway cable stitch is done just like the knot drop stitch, except the stitch that you make after winding your thread around the needle is longer and done at right angles on your line. It forms a very nice thick decorative stitch to use as an outline in your embroidery!
There are so many ways to embroider and of course which stitches you use will greatly depend on what you are making – but it’s always nice to know there are a lot more options than just a basic outline backstitch!
Do you know of any other outline embroidery stitches that we may have missed? Share them in the the comments below!